Welcome to the first post on Programming Fundamentals! If you haven’t set up Visual Studio, check out this previous blog post.
Creating the project
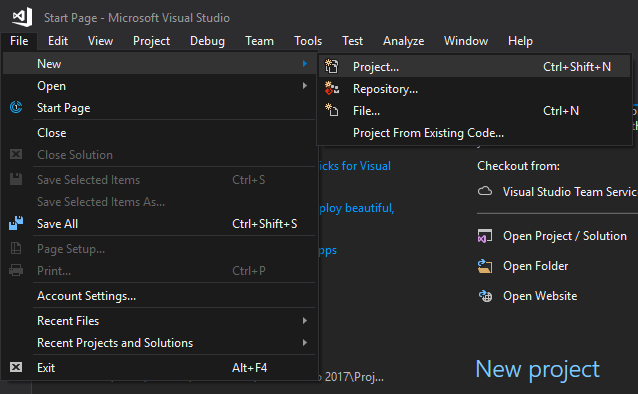
First of all, let’s set up a new project to work in. One way to do this is to select the File dropdown, New, and Project. As you can see, the shortcut Ctrl + Shift + N will also work in the future.
Once selected, an additional window will appear with numerous options. The left-hand side shows the various languages that are installed, while the middle section displays the various application types. The right-hand side meanwhile gives further information on the select option.
For the purpose of this post, let’s select ‘Visual C#’ on the left, and ‘Console App (.NET Framework)’ in the middle. Finally, we need to name the project below this – please note, there is a project name and a solution name. Visual Studio will automatically allocate the solution name as the project name, so we needn’t worry about that for the moment.
I will rename my project ‘Programming Fundamentals 01’ and then select ‘OK’.

Variables
You will notice immediately the sheer amount of code already in the project file. Essentially, everything we will write in this blog will be inside the following:
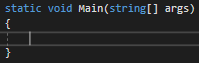
I will expand on what it all means at a later point.
Variables are one of the key building blocks of a program, allowing the programmer to store information for later use. Any data that needs to be reused, such as user input, will need to be stored in variables. The key thing to remember here is that the value of variables can be changed – they are not immutable, and are often temporary.
Variables are declared with a structure similar to the following:
<Data Type> Name = Value
A variable has to be declared before it is used – a declaration must have a type and a name, but a value doesn’t need to be immediately specified.
Data Types
Data types are what essentially defines the type of value a variable can hold. These correspond to what we use in maths, more often than not.
Here is a list of the most common ones:
int – Any whole number (25)
float – Any number with a decimal place (25.0f)
bool – A value of true or false (true)
string – A collection of characters (“String”)
char – A single character (‘c’)
Implementing a variable with a data type
It is fundamentally important to assign the right value that works in accordance with the type of the variable. Failing to do so will result in an error, and the program will not run.
Consider the following:

This is a correct declaration for a variable, of type int. Conversely, if we do not initialize it correctly:

This happens. The name and value are underlined in red, indicating that the variable cannot hold this value. An error would occur if we tried to run a program with this since the syntax is at fault.
Now, it is your turn. I have demonstrated the basics of variable creating, try creating one of a different type and value. Remember, keep it within the static void Main() section.
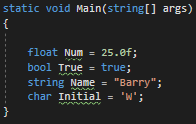
Your variable/s should be something like this:
Assigning variables
Lastly, before I conclude this post, I wish to touch upon assignment. A variable can either be assigned upon declaration or later on. This is done through the ‘=’ operator – I will talk more about operators in another post. Since a variable represents a value of a specific type, if another variable shares the same type, it could be assigned to the first, opening up many possibilities.
If you have any questions regarding this topic, feel free to grill me in the comments below. With that said, au revoir!